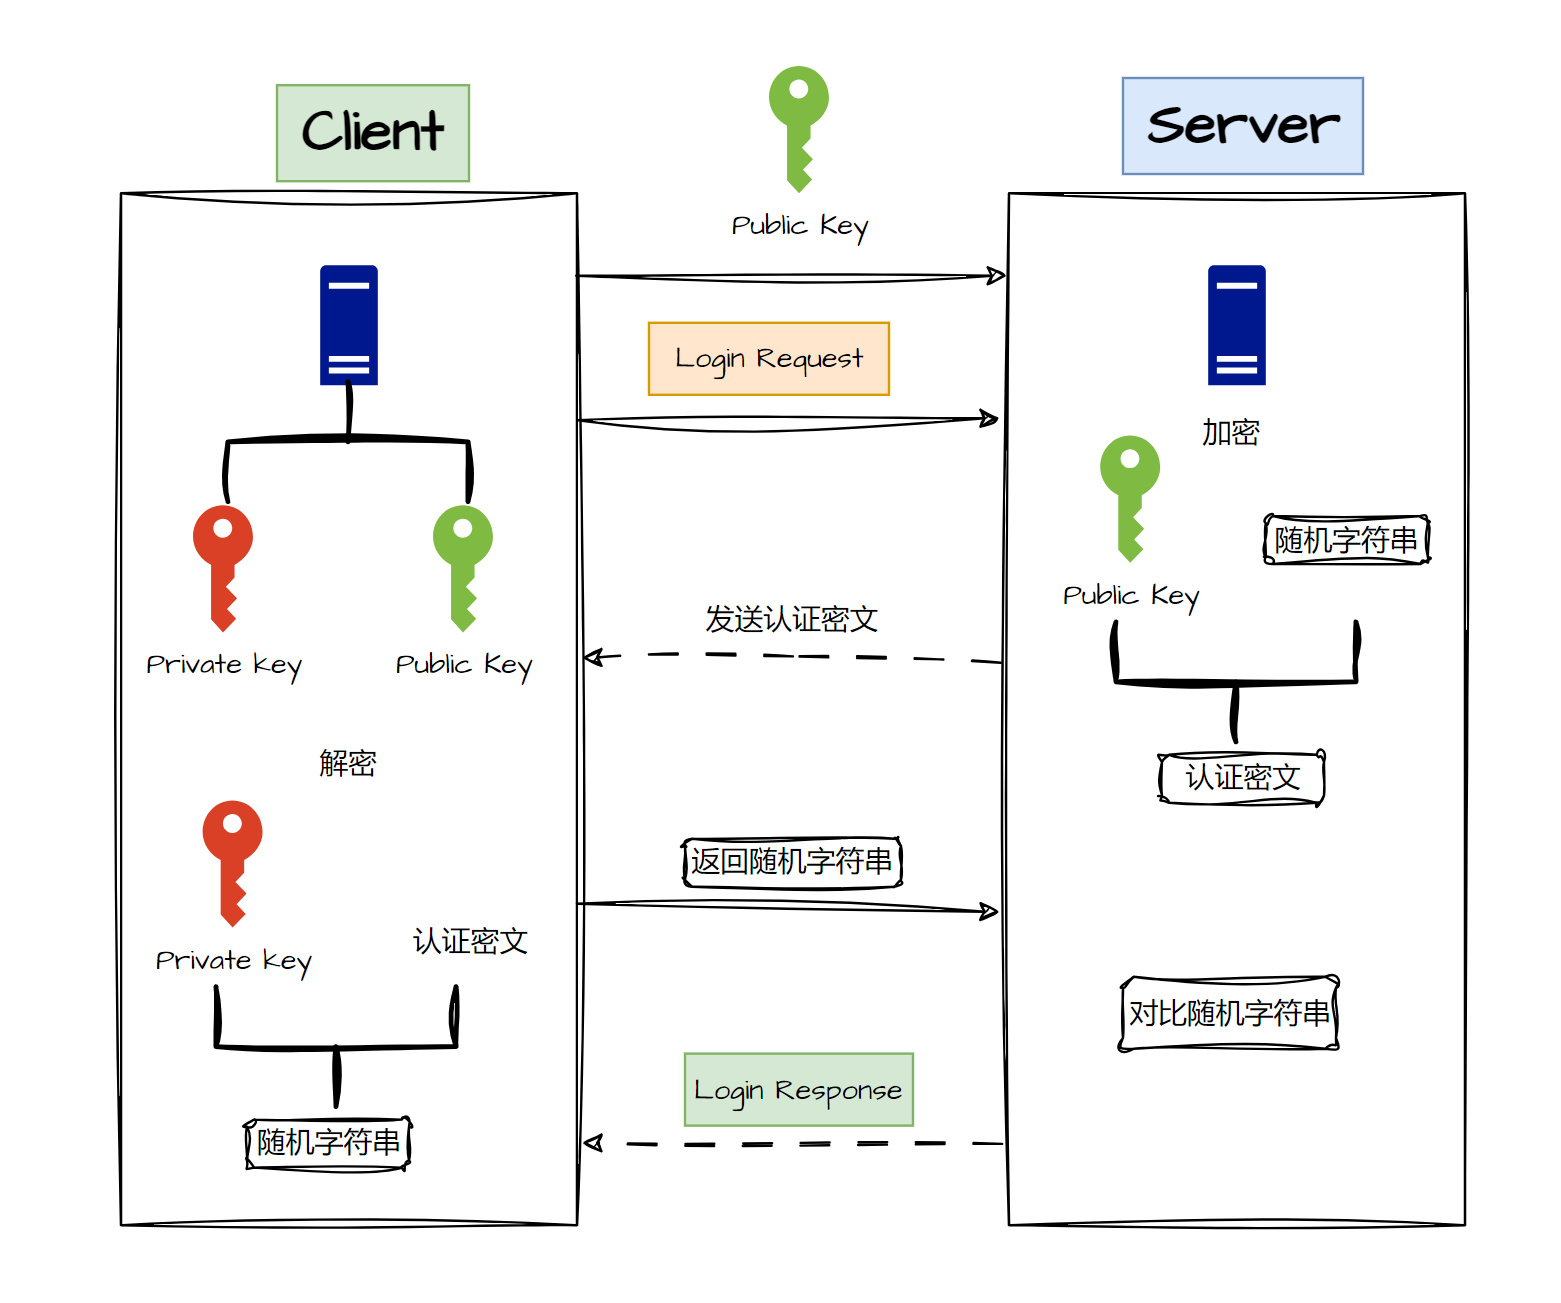
1.客户端生成秘钥对
root@ssh-client:~# ssh-keygen
Generating public/private rsa key pair.
Enter file in which to save the key (/root/.ssh/id_rsa): #回车
Enter passphrase (empty for no passphrase): #回车
Enter same passphrase again: #回车
Your identification has been saved in /root/.ssh/id_rsa
Your public key has been saved in /root/.ssh/id_rsa.pub
The key fingerprint is:
SHA256:xgco6yhGbfnmeFfcNlmz9ZPVdkpdPd0VsHb0JGt9+kw root@ssh-client
The key's randomart image is:
+---[RSA 3072]----+
| .ooO|
| . o**|
| . . . oooB|
| . .o . . .+ooB|
| . +. S o o.=oE|
|. .o. . + = ..*.|
|... .o . . . +|
|.. +. . |
| .... |
+----[SHA256]-----+
#查看秘钥文件
root@ssh-client:~# ls .ssh/
authorized_keys id_rsa id_rsa.pub
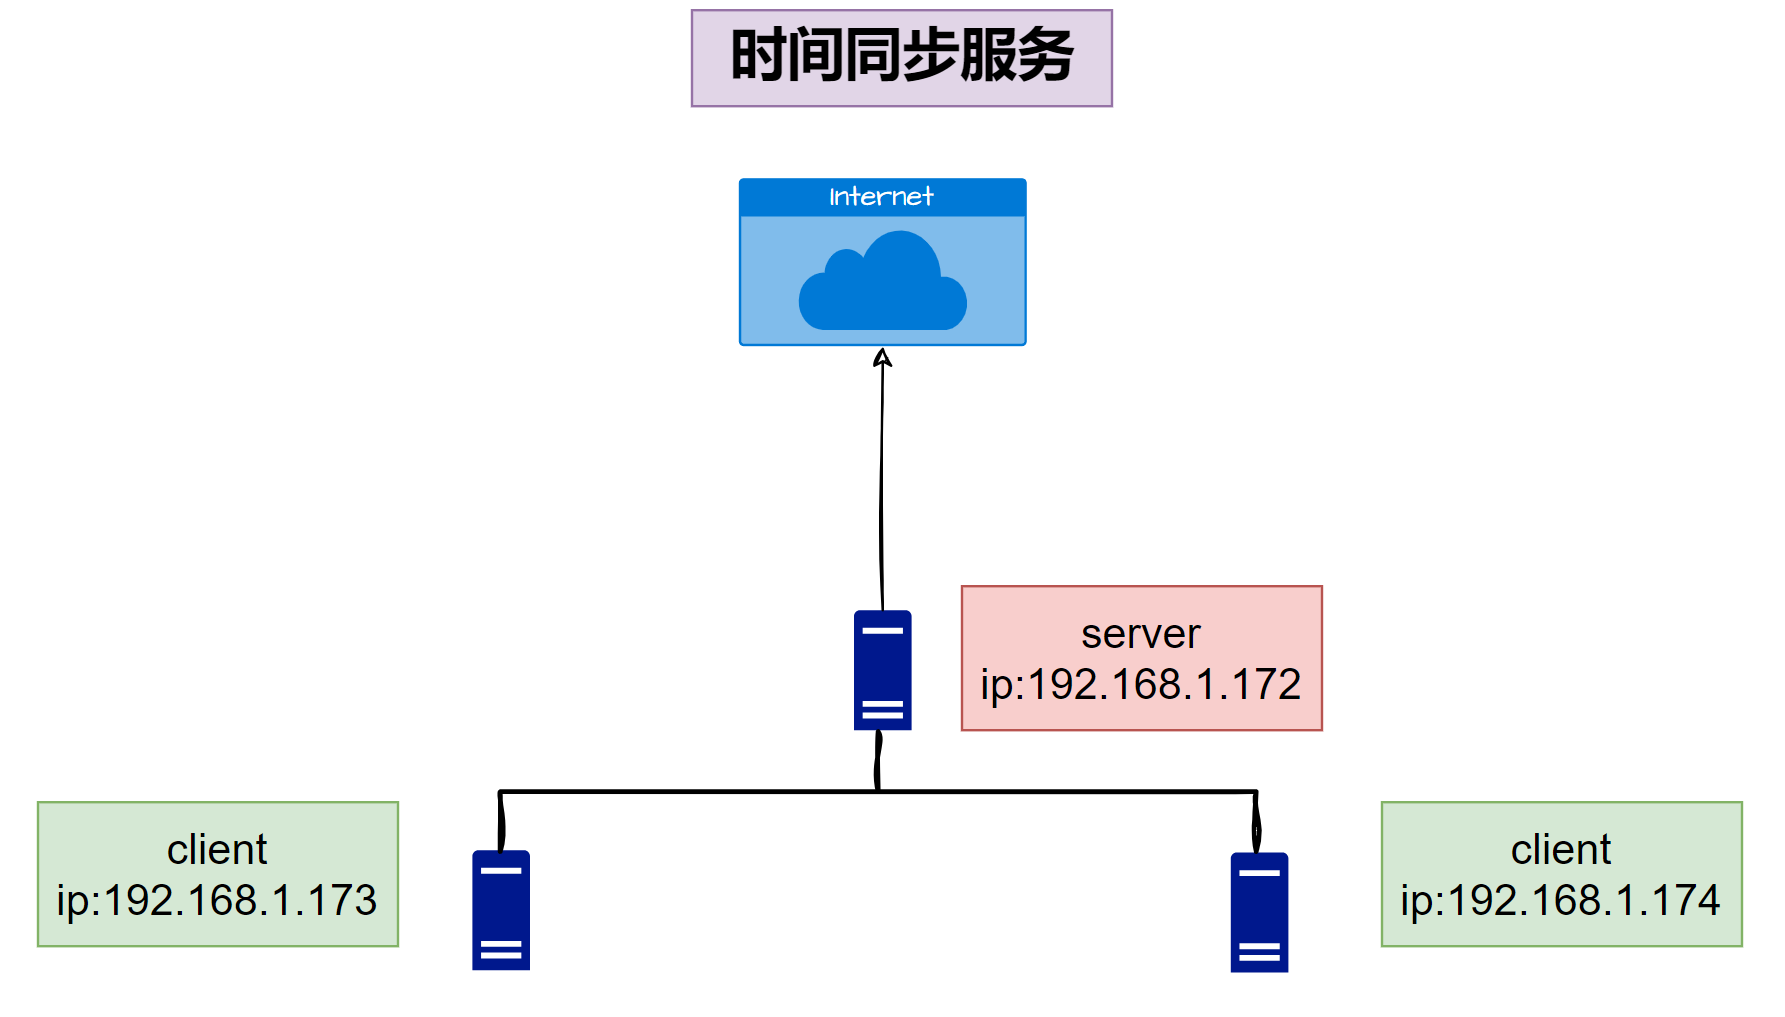
2.分发秘钥至server端
root@ssh-client:~# ssh-copy-id 192.168.1.173
/usr/bin/ssh-copy-id: INFO: Source of key(s) to be installed: "/root/.ssh/id_rsa.pub"
The authenticity of host '192.168.1.173 (192.168.1.173)' can't be established.
ECDSA key fingerprint is SHA256:XF2WytrueEY6X/gU0JPDyV/WhgxlhQyN2CmnEk0VL6k.
Are you sure you want to continue connecting (yes/no/[fingerprint])? yes #输入yes
/usr/bin/ssh-copy-id: INFO: attempting to log in with the new key(s), to filter out any that are already installed
/usr/bin/ssh-copy-id: INFO: 1 key(s) remain to be installed -- if you are prompted now it is to install the new keys
root@192.168.1.173's password: #输入server端root密码
Number of key(s) added: 1
Now try logging into the machine, with: "ssh '192.168.1.173'"
and check to make sure that only the key(s) you wanted were added.
#屏幕反馈尝试"ssh '192.168.1.173'"即为成功分发公钥
在server端查看authorized_keys文件可以看到client的公钥
root@ssh-server:~# cat .ssh/authorized_keys
ssh-rsa AAAAB3NzaC1yc2EAAAADAQABAAABgQCxPihowhM/yX3VkcgN9eVtA+UAtlswtYU9pvX+/9t0YTzZ9xYLg70g3lw/Lk385yxfVxqTXz12mMkk00K7vHb7Lj1D0l3qW9QAVU+5C6caOOW90/bgpL8VCRzEnMEtbWwm7scdjgEuKJvsgsMV+PR5awb765ldKutTTwtdIQOXFIUnpOTyhcry7qs80FZoZzXnUo1Togvt0TYrZ5gt2vipRv7vdn9s2ge0+6K3DAGvGxObcKaJasFYoSjiMTxqI85oACpY8bDx1D+g+I3Lv9HIfNu/vXcX9m86jHYZ5Mr63DtTCm+1fZ6yRl/Xp5F+g5MrpH+KtrphPCgrnHRLbgMS3sJHHerDD9UzRIBFZZRQeQ1gdIZWQDrIkmNkI2aAeRlGxki8rawoQoOQxaKundwDeCV/V33zrRNuC3jYVNzLsiq/1a9tEuzhDyZNxIJtGAMquEUpBLEXJzN0E1SrBI1jRsTdSuhe5Fy0eUDsAVc8fLoEMaRcFcr0zNouYsoFWI8= root@ssh-client
注:基于其他用户分发公钥的命令是ssh-copy-id username@ip 如:ssh-copy-id xiaoming@192.168.1.173
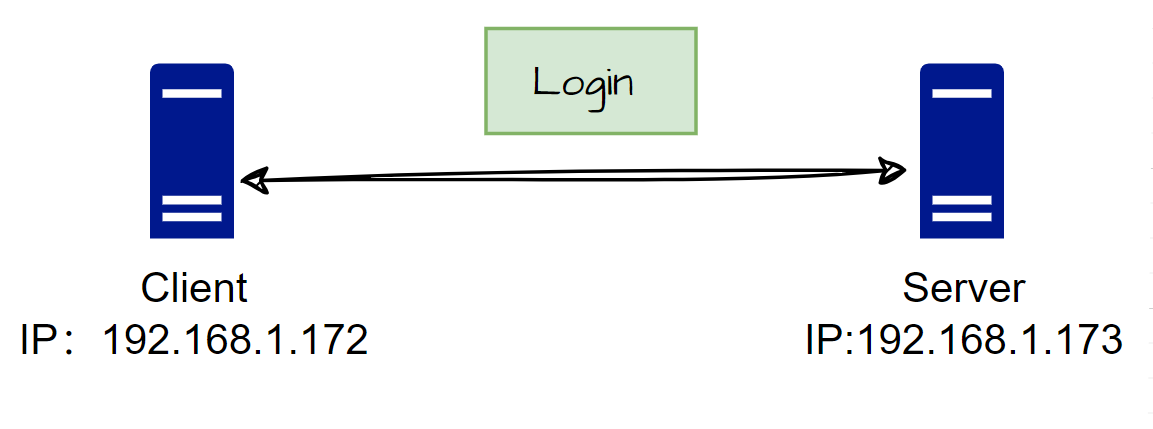
3.ssh登录server
root@ssh-client:~# ssh root@192.168.1.173
Welcome to Ubuntu 20.04.3 LTS (GNU/Linux 5.4.0-81-generic x86_64)
......
Last login: Sun Sep 29 11:29:39 2024 from 192.168.1.115
root@ssh-server:~# exit
logout
Connection to 192.168.1.173 closed.
注:ssh username@ip 该命令不加用户名则默认是root用户
二、sudo
sudo(superuser do)是一个在类 Unix 操作系统(如 Linux 和 macOS)中广泛使用的命令,它允许用户以更高的权限(通常是 root 权限)来执行命令。sudo 的设计目的是为了增强系统的安全性,同时简化系统管理员的任务。
name [TTL] IN rr_type value

name:记录的名字,通常是域名的一部分,可以是相对名字(相对于区域的顶级域)或绝对名字(完整域名)。
TTL:记录的生存时间,单位是秒。TTL 值定义了该记录在 DNS 缓存中应保留的时间长度。
IN:标识符,表示该记录属于 Internet 类型(INternet)。尽管现在几乎总是使用 IN,但它仍然是语法的一部分。
rr_type:记录的类型,例如 A、AAAA、CNAME、MX、NS、PTR、TXT、SRV 等。
value:记录的值,根据不同的记录类型,值的内容有所不同
#安装相关软件
[root@dns-server ~]#apt update && apt -y install bind9 bind9-utils
#查看相关的配置文件所在目录
#配置 BIND 服务器
[root@dns-server ~]#cat /etc/bind/named.conf.default-zones
......
#添加域
zone "lyon.org" {
	type master;
	file "/etc/bind/db.lyon.org"; #指定数据库文件
};


#语法检查
[root@dns-server ~]#named-checkconf


#设置本地网络递归查询
[root@dns-server ~]#cat /etc/bind/named.conf.options
options {
	directory "/var/cache/bind";

	// If there is a firewall between you and nameservers you want
	// to talk to, you may need to fix the firewall to allow multiple
	// ports to talk.  See http://www.kb.cert.org/vuls/id/800113

	// If your ISP provided one or more IP addresses for stable
	// nameservers, you probably want to use them as forwarders.
	// Uncomment the following block, and insert the addresses replacing
	// the all-0's placeholder.

	// forwarders {
	// 	0.0.0.0;
	// };

	//========================================================================
	// If BIND logs error messages about the root key being expired,
	// you will need to update your keys.  See https://www.isc.org/bind-keys
	//========================================================================
	dnssec-validation auto;

	listen-on-v6 { any; };
        recursion yes;
        allow-recursion { localnets; };
        listen-on { any; };
};
#语法检查
[root@dns-server ~]#named-checkconf /etc/bind/named.conf.options
#重启服务并查看服务是否正常运行
[root@dns-server ~]#systemctl restart named
[root@dns-server ~]#systemctl status named


#创建数据库文件
[root@dns-server ~]#cat /etc/bind/db.lyon.org
$TTL 3D
@       IN      SOA     ns1.lyon.org. hostmaster.lyon.org. (
                                         1         ; serial #版本号,更新数据时版本号也要更新
                                         604800    ; refresh #拉取数据的时间间隔
                                         86400     ; retry #同步数据失败后多长时间再执行同步操作
                                         2419200   ; expire #多次同步失败之后移除从节点的时间
                                         604800 )  ; minimum #用户查询的不存在记录的缓存期

@       IN      NS      ns1.lyon.org. # NS表示本域内谁可做域名解析,可理解为网络中有几个dns服务器
ns1     IN      A       192.168.1.170
lyon.org. IN    A       192.168.1.175
www     IN      A       192.168.1.175
注:
1."@"表示本域名,用于代替默认域名。
2.TTL值可以全局继承,所以在文件开头声明即可
3.ns1.lyon.org.表示权威DNS,只起描述作用。hostmaster.lyon.org.表示管理员邮箱。
4.此文件默认会补全域名,若是在域名字段不加“.”结尾则会默认补全,如:“lyon.org”会默认补全为“lyon.org.lyon.org”,若是加了“.”则原样输出,不会补全

#检查域文件语法
[root@dns-server ~]#named-checkzone "lyon.org" /etc/bind/db.lyon.org
zone lyon.org/IN: loaded serial 1
OK
#端口检查
[root@dns-server ~]#ss -ntlp |grep 53
LISTEN 0      10                        192.168.1.170:53           0.0.0.0:*     users:(("named",pid=152124,fd=33))
LISTEN 0      10                        192.168.1.170:53           0.0.0.0:*     users:(("named",pid=152124,fd=34))
LISTEN 0      10                            127.0.0.1:53           0.0.0.0:*     users:(("named",pid=152124,fd=27))
LISTEN 0      10                            127.0.0.1:53           0.0.0.0:*     users:(("named",pid=152124,fd=28))
LISTEN 0      4096                      127.0.0.53%lo:53           0.0.0.0:*     users:(("systemd-resolve",pid=682,fd=13))
LISTEN 0      5                             127.0.0.1:953          0.0.0.0:*     users:(("named",pid=152124,fd=24))
LISTEN 0      5                             127.0.0.1:953          0.0.0.0:*     users:(("named",pid=152124,fd=43))
LISTEN 0      10                                [::1]:53              [::]:*     users:(("named",pid=152124,fd=38))
LISTEN 0      10                                [::1]:53              [::]:*     users:(("named",pid=152124,fd=37))
LISTEN 0      10       [fe80::5054:ff:fe89:6608]%eth0:53              [::]:*     users:(("named",pid=152124,fd=42))
LISTEN 0      10       [fe80::5054:ff:fe89:6608]%eth0:53              [::]:*     users:(("named",pid=152124,fd=41))
LISTEN 0      5                                 [::1]:953             [::]:*     users:(("named",pid=152124,fd=45))
2.2 web端
[root@web ~]#hostname -i
192.168.1.175 fe80::5054:ff:fe80:7e2a
[root@web ~]#apt update && apt install -y nginx
#修改首页文件
[root@web html]#cat /var/www/html/index.nginx-debian.html
hello world!!!
[root@web html]#nginx -t
nginx: the configuration file /etc/nginx/nginx.conf syntax is ok
nginx: configuration file /etc/nginx/nginx.conf test is successful
[root@web html]#nginx -s reload
2.3 配置客户端
[root@dns-client ~]#hostname -i
192.168.1.176 fe80::5054:ff:fe9a:b623
[root@dns-client ~]#cat /etc/netplan/00-installer-config.yaml
# This is the network config written by 'subiquity'
network:
renderer: networkd
ethernets:
eth0:
dhcp4: no
addresses: [192.168.1.176/24]
gateway4: 192.168.1.1
nameservers:
addresses: ["192.168.1.170"] #修改此处把dns服务器指向我们自己搭建的服务器
version: 2
#重启网络
[root@dns-client ~]#netplan apply
#测试是否能解析出web端地址
[root@dns-client ~]#dig lyon.org
; <<>> DiG 9.16.1-Ubuntu <<>> lyon.org
;; global options: +cmd
;; Got answer:
;; ->>HEADER<<- opcode: QUERY, status: NOERROR, id: 20975
;; flags: qr rd ra; QUERY: 1, ANSWER: 1, AUTHORITY: 0, ADDITIONAL: 1
;; OPT PSEUDOSECTION:
; EDNS: version: 0, flags:; udp: 65494
;; QUESTION SECTION:
;lyon.org. IN A
;; ANSWER SECTION:
lyon.org. 6749 IN A 192.168.1.175 #地址解析正确
;; Query time: 0 msec
;; SERVER: 127.0.0.53#53(127.0.0.53)
;; WHEN: Sat Sep 21 21:33:05 CST 2024
;; MSG SIZE rcvd: 53
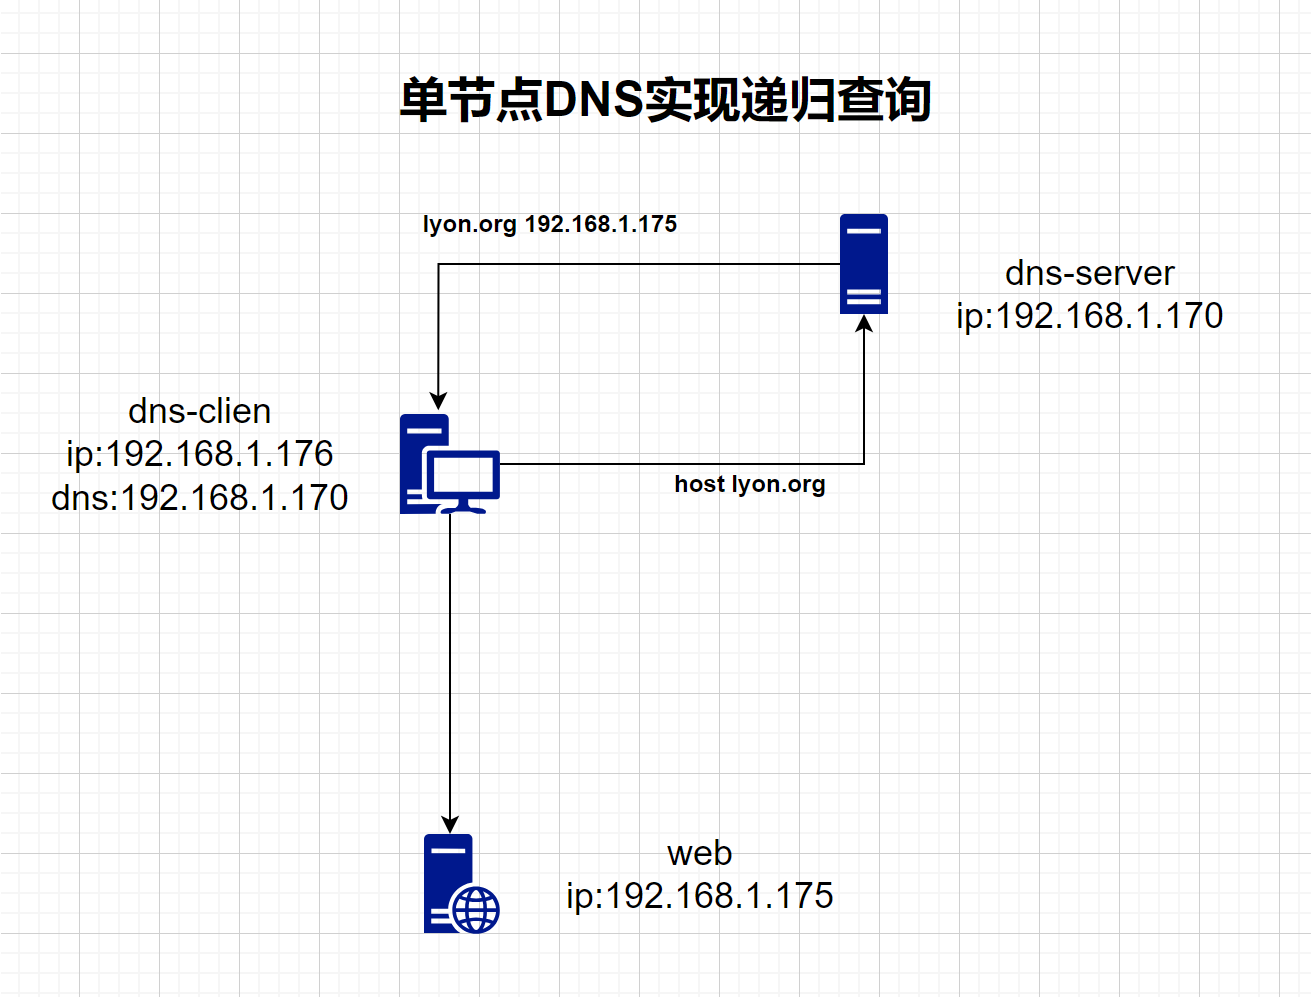
[root@dns-client ~]#host lyon.org
lyon.org has address 192.168.1.175
#分别使用ping命令和curl命令测试
[root@dns-client ~]#ping -c 1 lyon.org
PING lyon.org (192.168.1.175) 56(84) bytes of data.
64 bytes from 192.168.1.175 (192.168.1.175): icmp_seq=1 ttl=64 time=0.615 ms
--- lyon.org ping statistics ---
1 packets transmitted, 1 received, 0% packet loss, time 0ms
rtt min/avg/max/mdev = 0.615/0.615/0.615/0.000 ms
[root@dns-client ~]#curl lyon.org
hello world!!!
#解析成功
通过抓包命令获取DNS解析过程
#开启抓包
[root@dns-server ~]#tcpdump -i eth0 udp port 53 -nn
#客户端使用host命令解析lyon.org
[root@dns-client ~]#host lyon.org
lyon.org has address 192.168.1.175
#观察报文 可看到完成的请求和响应过程
[root@dns-server ~]#tcpdump -i eth0 udp port 53 -nn
tcpdump: verbose output suppressed, use -v or -vv for full protocol decode
listening on eth0, link-type EN10MB (Ethernet), capture size 262144 bytes
21:57:55.140450 IP 192.168.1.176.46761 > 192.168.1.170.53: 62521+ [1au] AAAA? lyon.org. (37)
21:57:55.140666 IP 192.168.1.170.53 > 192.168.1.176.46761: 62521* 0/1/1 (88)
21:57:55.141282 IP 192.168.1.176.54577 > 192.168.1.170.53: 52479+ [1au] MX? lyon.org. (37)
21:57:55.141516 IP 192.168.1.170.53 > 192.168.1.176.54577: 52479* 0/1/1 (88)
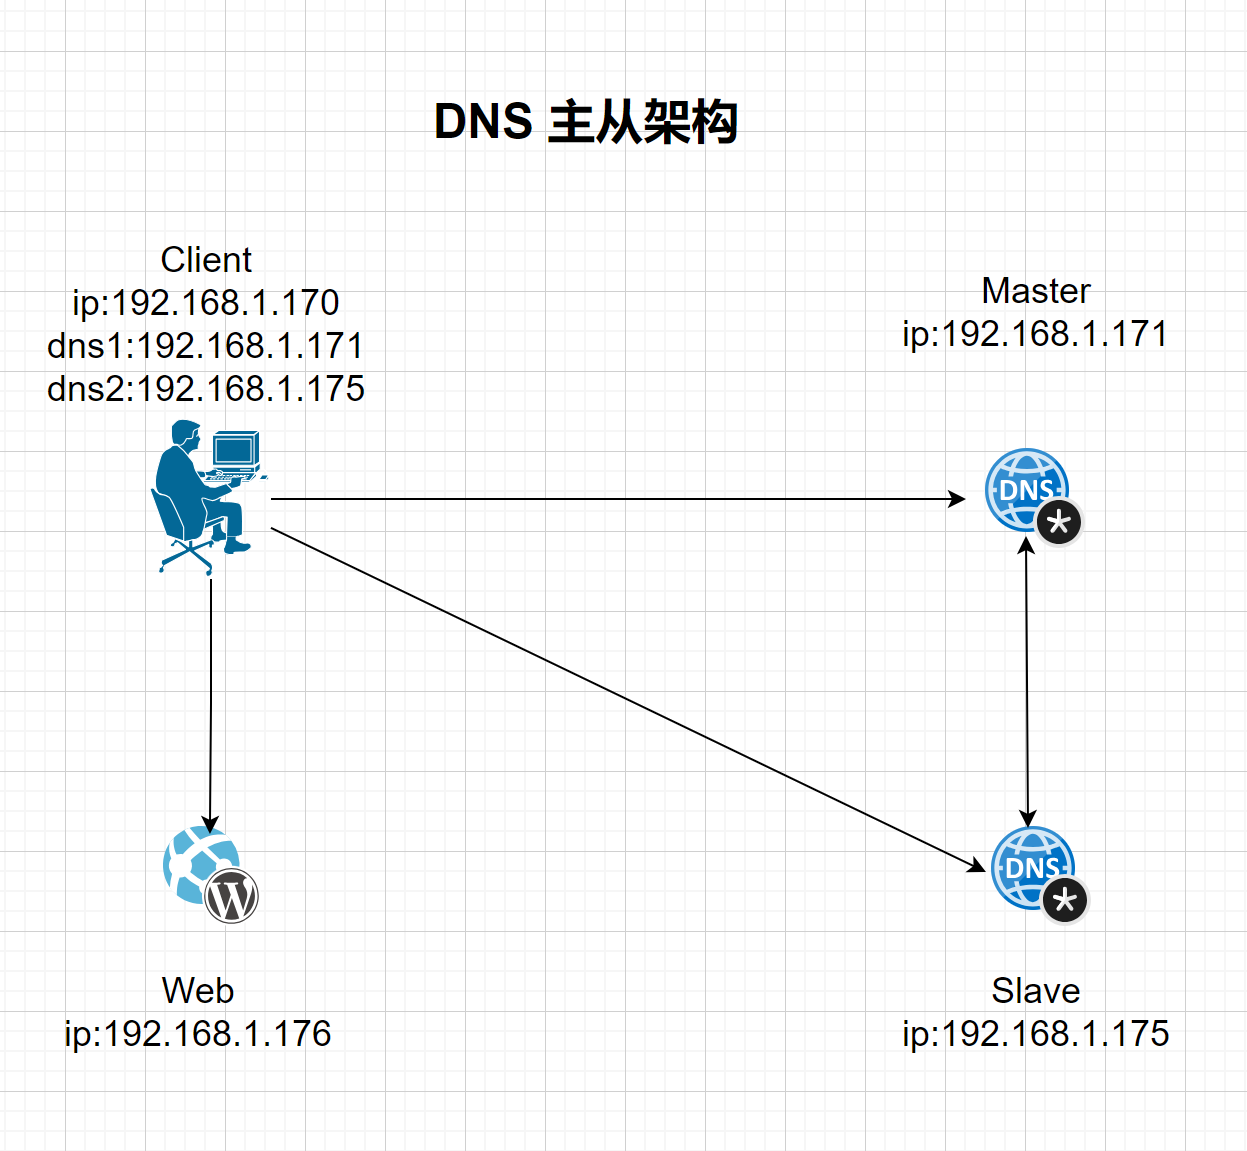
三、搭建DNS主从同步
3.1 主节点配置
拓扑图:
1.两个DNS服务器安装bind9和相关工具
root@dns-master:~# apt update && apt install -y bind9 bind9-utils
root@dns-slave:~# apt update && apt install -y bind9 bind9-utils


2.配置主dns服务器
 2.1 添加域
root@dns-master:/etc/bind# cat named.conf.default-zones
......
zone "lyon.org" {
	type master;
	file "/etc/bind/db.lyon.org";
        allow-transfer { 192.168.1.175; }; #允许从节点同步数据
};

#配置文件语法检查
root@dns-master:/etc/bind# named-checkconf


 2.2 修改主配置文件 named.conf.options
root@dns-master:/etc/bind# cat named.conf.options
options {
	directory "/var/cache/bind";
......  #添加以下字段
	dnssec-validation auto;
        recursion yes;
        allow-recursion { localnets; };
        listen-on { any; };
	listen-on-v6 { any; };
};


 2.3 创建数据库文件
root@dns-master:/etc/bind# ls
bind.keys  db.0  db.127  db.255  db.empty  db.local  named.conf  named.conf.default-zones  named.conf.local  named.conf.options  rndc.key  zones.rfc1918

#将自带的文件复制一份以此修改
root@dns-master:/etc/bind# cat /etc/bind/db.lyon.org
;
; BIND data file for local loopback interface
;
$TTL	604800
$TTL	604800
@	IN	SOA	lyon.org. admin.lyon.org (
			      2		; Serial
			 604800		; Refresh
			  86400		; Retry
			2419200		; Expire
			 604800 )	; Negative Cache TTL
;
@	IN	NS	lyon.org.
lyon.org.	IN	A	192.168.1.176
www     IN       A      192.168.1.176


#语法检查
root@dns-master:/etc/bind# named-checkzone "lyon.org" /etc/bind/db.lyon.org
zone lyon.org/IN: loaded serial 2
OK

 2.4 重启服务
root@dns-master:/etc/bind# rndc reload
server reload successful

#查看服务状态
root@dns-master:/etc/bind# systemctl status  named
1.修改网络配置文件中的DNS服务器地址
root@client:~# cat /etc/netplan/00-installer-config.yaml
# This is the network config written by 'subiquity'
network:
  renderer: networkd
  ethernets:
    eth0:
      dhcp4: no
      addresses: [192.168.1.170/24]
      gateway4: 192.168.1.1
      nameservers:
              addresses: ["192.168.1.175"]
  version: 2
注:此处可以把DNS指向主和从节点的DNS服务器,但是此时仅指向了从节点的DNS,若是能在从节点上实现解析则说明从节点能从主节点同步数据。
2.在重新生效网络文件之前先尝试解析
root@client:~# dig lyon.org
......
;; ANSWER SECTION:
lyon.org.		587	IN	A	3.33.130.190
lyon.org.		587	IN	A	15.197.148.33
......
注:lyon.org域名此时还是解析到互联网上的公网地址

3.重新应用网络配置文件
root@client:~# netplan apply

4.再次尝试解析 留意观察解析出来的地址是否是192.168.1.176
root@client:~# dig lyon.org
......
;; ANSWER SECTION:
lyon.org.		604800	IN	A	192.168.1.176
......
root@client:~# host lyon.org
lyon.org has address 192.168.1.176

5.使用curl 命令访问ngixn
root@client:~# curl lyon.org
hello world!!!
访问成功,主从架构的DNS服务器搭建成功。
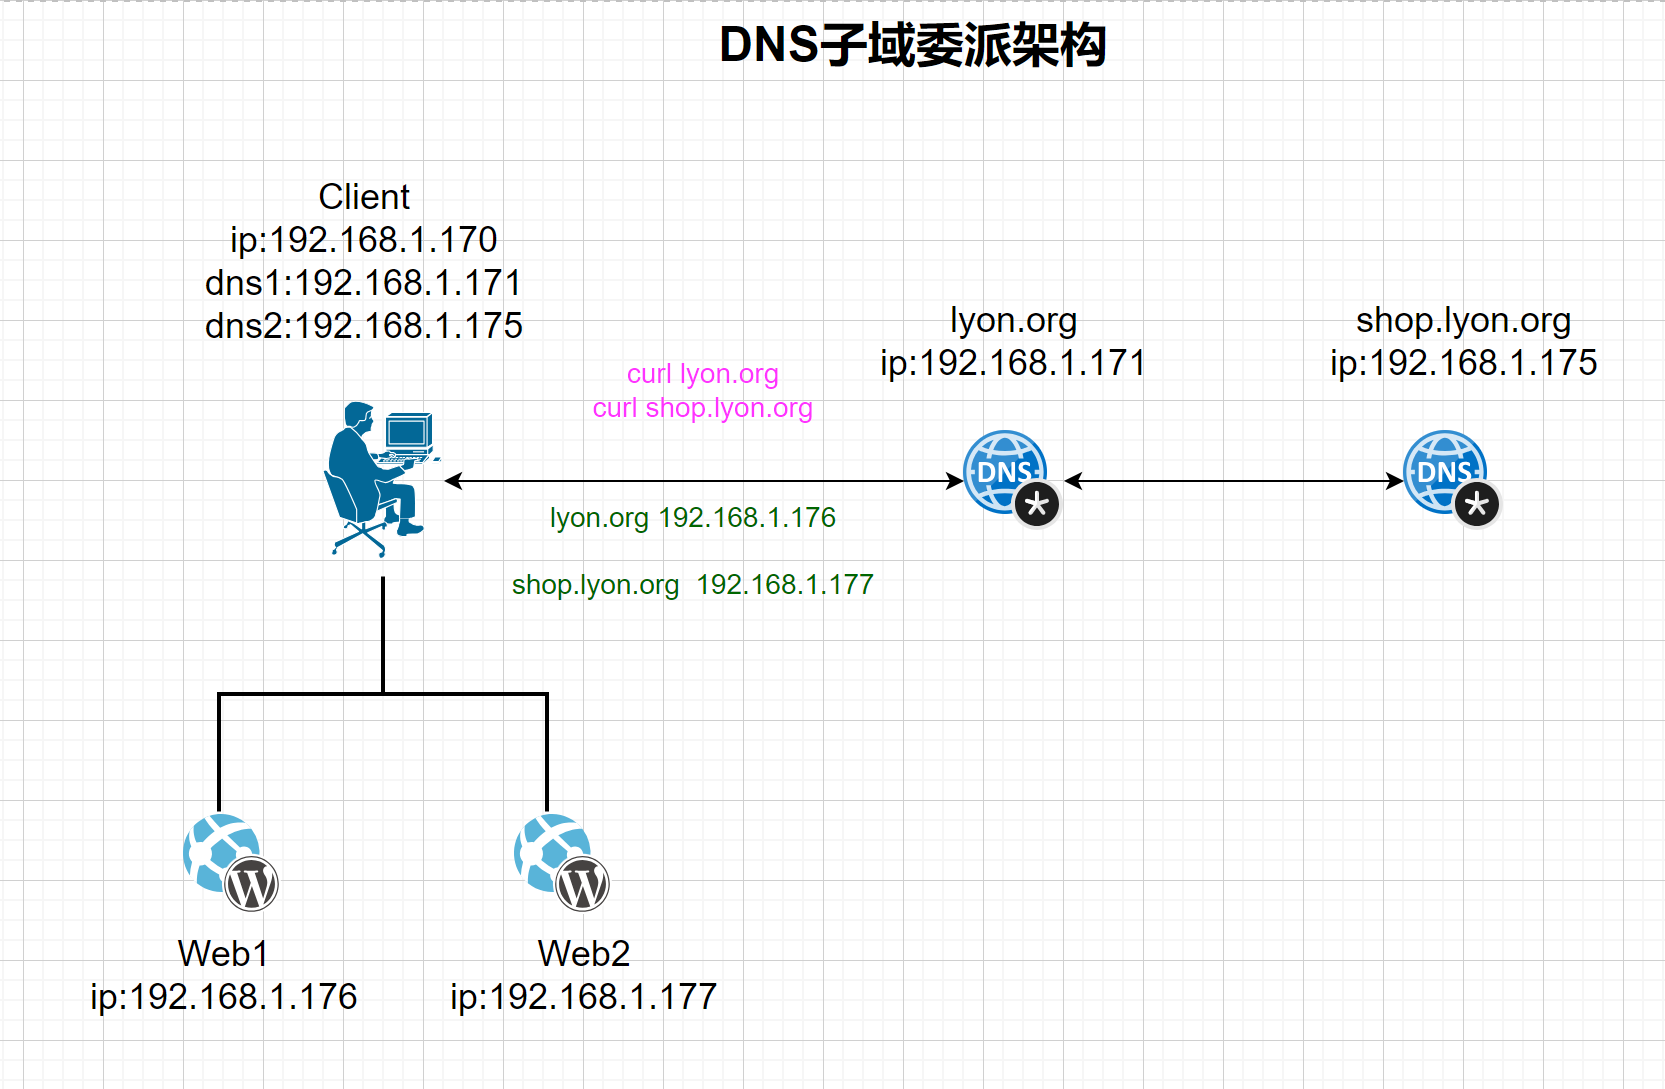
四、子域授权
DNS 子域授权是指在一个较大的 DNS 域中将一个子域的管理权限委托给另一个 DNS 服务器的过程。当一个顶级域或主域的所有者希望将一部分子域的管理职责交给另一个组织或个人时,就需要进行子域授权。这通常涉及到在父域的 DNS 区域文件中设置 NS(Name Server)记录和 SOA(Start of Authority)记录。
[root@rocky8 ~]#cat ping.sh
#!/bin/bash
#**********************************************************
#Author:                    liangweisong
#QQ:                        965291014@qq.com
#Date:                      2024-08-31
#FileName:                  ping.sh
#URL:
#Description:                   The test script
#**********************************************************
NET=10.0.0
#NET为所处网段的前24位十进制地址
for i in  {1..254};do
{
 ping  -c1  -W1 $NET.$i &> /dev/null && echo $NET.$i is up| tee -a ./up_list.txt || echo $NET.$i is down
}&
done
wait
#创建文件
[root@rocky8 ~]#touch up_list.txt
#执行脚本
[root@rocky8 ~]#bash ping.sh
10.0.0.1 is up
10.0.0.2 is up
10.0.0.210 is up
10.0.0.153 is up
10.0.0.3 is down
......
[root@rocky8 ~]#cat up_list.txt
10.0.0.1 is up
10.0.0.2 is up
10.0.0.210 is up
10.0.0.153 is up
二、使用while read line和/etc/passwd,计算用户id总和。
while 循环的特殊用法,遍历文件或文本的每一行
while read line; do
循环体
done < /PATH/FROM/SOMEFILE
[root@rocky8 ~]#cat wrl.sh
#!/bin/bash
#**********************************************************
#Author:                    liangweisong
#QQ:                        965291014@qq.com
#Date:                      2024-08-31
#FileName:                  wrl.sh
#URL:
#Description: 使用while read line和/etc/passwd,计算用户id总和。
#**********************************************************
# 初始化 UID 总和为 0
uid_sum=0

# 逐行读取 /etc/passwd 文件
while IFS=: read -r username password uid gid fullname home_directory shell; do
    # 将 UID 转换为整数并累加到总和中
    uid_sum=$((uid_sum + uid))
done < /etc/passwd

# 打印 UID 总和
echo "The sum of all user IDs is: $uid_sum"
[root@rocky8 ~]#bash wrl.sh
The sum of all user IDs is: 72071
# 访问第一个元素
first_element=${indexed_array[0]}

# 访问最后一个元素
last_element=${indexed_array[-1]}

# 遍历数组
for element in "${indexed_array[@]}"; do
    echo "$element"
done
3.2 关联数组
关联数组是一种基于键值对的数组。每个元素都有一个唯一的键(字符串)和对应的值。
创建关联数组
# 创建一个空关联数组
declare -A assoc_array

# 添加元素
assoc_array[key1]="value1"
assoc_array[key2]="value2"
assoc_array[key3]="value3"
访问关联数组元素
# 访问键为 key1 的元素
value1=${assoc_array[key1]}

# 遍历关联数组
for key in "${!assoc_array[@]}"; do
    value=${assoc_array[$key]}
    echo "$key: $value"
done
ip 命令可以临时修改网络环境,主要用法有:查看IP地址、禁用启用网卡、添加IP地址、修改路由表等功能。但是所有的修改操作都是临时生效,若是重启主机,所有的修改将会失效,若是想永久生效ip命令的修改配置,可以把命令写入rc.local文件内,在rc.local文件权限足够的情况下,实现开机自动加载该命令。
[root@rocky8 ~]#man ip
......
EXAMPLES
       ip addr
           Shows addresses assigned to all network interfaces.

       ip neigh
           Shows the current neighbour table in kernel.

       ip link set x up
           Bring up interface x.

       ip link set x down
           Bring down interface x.

       ip route
           Show table routes.
......
1.1.1 ip 命令常用用法
1.查看ip地址信息
[root@rocky8 ~]#ip a
1: lo: <LOOPBACK,UP,LOWER_UP> mtu 65536 qdisc noqueue state UNKNOWN group default qlen 1000
    link/loopback 00:00:00:00:00:00 brd 00:00:00:00:00:00
    inet 127.0.0.1/8 scope host lo
       valid_lft forever preferred_lft forever
    inet6 ::1/128 scope host
       valid_lft forever preferred_lft forever
2: eth0: <BROADCAST,MULTICAST,UP,LOWER_UP> mtu 1500 qdisc mq state UP group default qlen 1000
    link/ether 00:0c:29:21:19:21 brd ff:ff:ff:ff:ff:ff
    inet 10.0.0.210/24 brd 10.0.0.255 scope global noprefixroute eth0
       valid_lft forever preferred_lft forever
    inet6 fe80::20c:29ff:fe21:1921/64 scope link
       valid_lft forever preferred_lft forever
3: eth1: <BROADCAST,MULTICAST,UP,LOWER_UP> mtu 1500 qdisc mq state UP group default qlen 1000
    link/ether 00:0c:29:21:19:2b brd ff:ff:ff:ff:ff:ff
    inet 192.168.1.210/24 brd 192.168.1.255 scope global noprefixroute eth1
       valid_lft forever preferred_lft forever
    inet6 fe80::20c:29ff:fe21:192b/64 scope link
       valid_lft forever preferred_lft forever

2.临时关闭或启用网卡
#关闭网卡
[root@rocky8 ~]#ip link set eth1 down
[root@rocky8 ~]#ip link show|grep eth1
3: eth1: <BROADCAST,MULTICAST> mtu 1500 qdisc mq state DOWN mode DEFAULT group default qlen 1000
#启用网卡
[root@rocky8 ~]#ip link set eth1 up
[root@rocky8 ~]#ip link show |grep eth1
3: eth1: <BROADCAST,MULTICAST,UP,LOWER_UP> mtu 1500 qdisc mq state UP mode DEFAULT group default qlen 1000

3.添加ip地址
#给eth1网卡添加ip地址:192.168.1.100
[root@rocky8 ~]#ip addr add 192.168.1.100/24 dev eth1
[root@rocky8 ~]#ip a |grep eth1
3: eth1: <BROADCAST,MULTICAST,UP,LOWER_UP> mtu 1500 qdisc mq state UP group default qlen 1000
    inet 192.168.1.210/24 brd 192.168.1.255 scope global noprefixroute eth1
    inet 192.168.1.100/24 scope global secondary eth1

4.删除添加的ip地址
[root@rocky8 ~]#ip addr del 192.168.1.100/24 dev eth1
[root@rocky8 ~]#ip a |grep eth1
3: eth1: <BROADCAST,MULTICAST,UP,LOWER_UP> mtu 1500 qdisc mq state UP group default qlen 1000
    inet 192.168.1.210/24 brd 192.168.1.255 scope global noprefixroute eth1

5.设置网关
ip route add default via 192.168.1.1

6.查看和添加路由规则
#查看路由规则
[root@rocky8 ~]#ip route show
#添加规则
[root@rocky8 ~]#ip route add 规则
1.2 nmcli 命令
nmcli(NetworkManager Command Line Interface)是一个命令行工具,用于控制和管理 NetworkManager,后者是 Linux 系统中用于管理网络连接的一个守护进程。nmcli 提供了一个方便的方式来查询、配置和管理网络连接,而无需使用图形界面。和ip命令不同的是nmcli的修改结果是永久生效的。
nmcli命令常用用法:
列出网络连接:查看系统中存在的网络连接。
创建新的网络连接:手动配置网络接口。
修改现有网络连接:更改网络接口的配置。
删除网络连接:移除不再需要的网络连接。
启动或停止网络连接:激活或去激活网络连接。
查询网络状态:获取有关网络连接的信息。
[root@rocky8 ~]#man nmcli
.....
EXAMPLES
       This section presents various examples of nmcli usage. If you want even more, please refer to nmcli-examples(7) manual page.

       nmcli -t -f RUNNING general
           tells you whether NetworkManager is running or not.

       nmcli -t -f STATE general
           shows the overall status of NetworkManager.

       nmcli radio wifi off
           switches Wi-Fi off.

       nmcli connection show
           lists all connections NetworkManager has.

       nmcli -p -m multiline -f all con show
           shows all configured connections in multi-line mode.

       nmcli connection show --active
           lists all currently active connections.

       nmcli -f name,autoconnect c s
           shows all connection profile names and their auto-connect property.
......
1.2.1 nmcli 命令常用用法
1.查看网络连接 网卡和网络配置文件的对应关系
[root@rocky8 ~]#nmcli con show
NAME      UUID                                  TYPE      DEVICE
con-eth0  5fb06bd0-0bb0-7ffb-45f1-d6edd65f3e03  ethernet  eth0
con-eth1  9c92fad9-6ecb-3e6c-eb4d-8a47c6f50c04  ethernet  eth1

2.修改现有的网络连接信息
#修改网卡eth1的地址为:192.168.1.100/24 网关:192.168.1.1 dns:8.8.8.8 con-eth1为eth1所对应的网卡信息文件
[root@rocky8 ~]#nmcli con modify con-eth1 ipv4.addresses 192.168.1.100/24 ipv4.dns 8.8.8.8 ipv4.gateway 192.168.1.1
#更新配置信息
[root@rocky8 ~]#nmcli con up con-eth1
Connection successfully activated (D-Bus active path: /org/freedesktop/NetworkManager/ActiveConnection/4)
#查看eth1的ip信息
[root@rocky8 ~]#ip a |grep eth1
3: eth1: <BROADCAST,MULTICAST,UP,LOWER_UP> mtu 1500 qdisc mq state UP group default qlen 1000
    inet 192.168.1.100/24 brd 192.168.1.255 scope global noprefixroute eth1

3. 给网卡eth1 添加ip地址
#con-name 表示配置信息文件名 ifname后面接应用的网卡名 ipv4.method manual表示为手动配置的ip地址
[root@rocky8 ~]#nmcli con add con-name static ifname eth1 ipv4.addresses 192.168.1.101/24 ipv4.dns 8.8.8.8 ipv4.gateway 192.168.1.1 ipv4.method manual
#激活配置
[root@rocky8 ~]#nmcli con up static
[root@rocky8 ~]#nmcli con reload
[root@rocky8 ~]#nmcli con up bond0
Connection successfully activated (master waiting for slaves) (D-Bus active path: /org/freedesktop/NetworkManager/ActiveConnection/4)
查看bond0网卡信息
[root@rocky8 ~]#ip a |grep bond0
4: bond0: <NO-CARRIER,BROADCAST,MULTICAST,MASTER,UP> mtu 1500 qdisc noqueue state DOWN group default qlen 1000
    inet 10.0.0.210/24 brd 10.0.0.255 scope global noprefixroute bond0
在同局域网另外一个主机ping 测试一下网络连通性
[root@ubuntu2004 ~]#ping 10.0.0.210
PING 10.0.0.210 (10.0.0.210) 56(84) bytes of data.
64 bytes from 10.0.0.210: icmp_seq=1 ttl=64 time=0.383 ms
64 bytes from 10.0.0.210: icmp_seq=2 ttl=64 time=0.432 ms
......
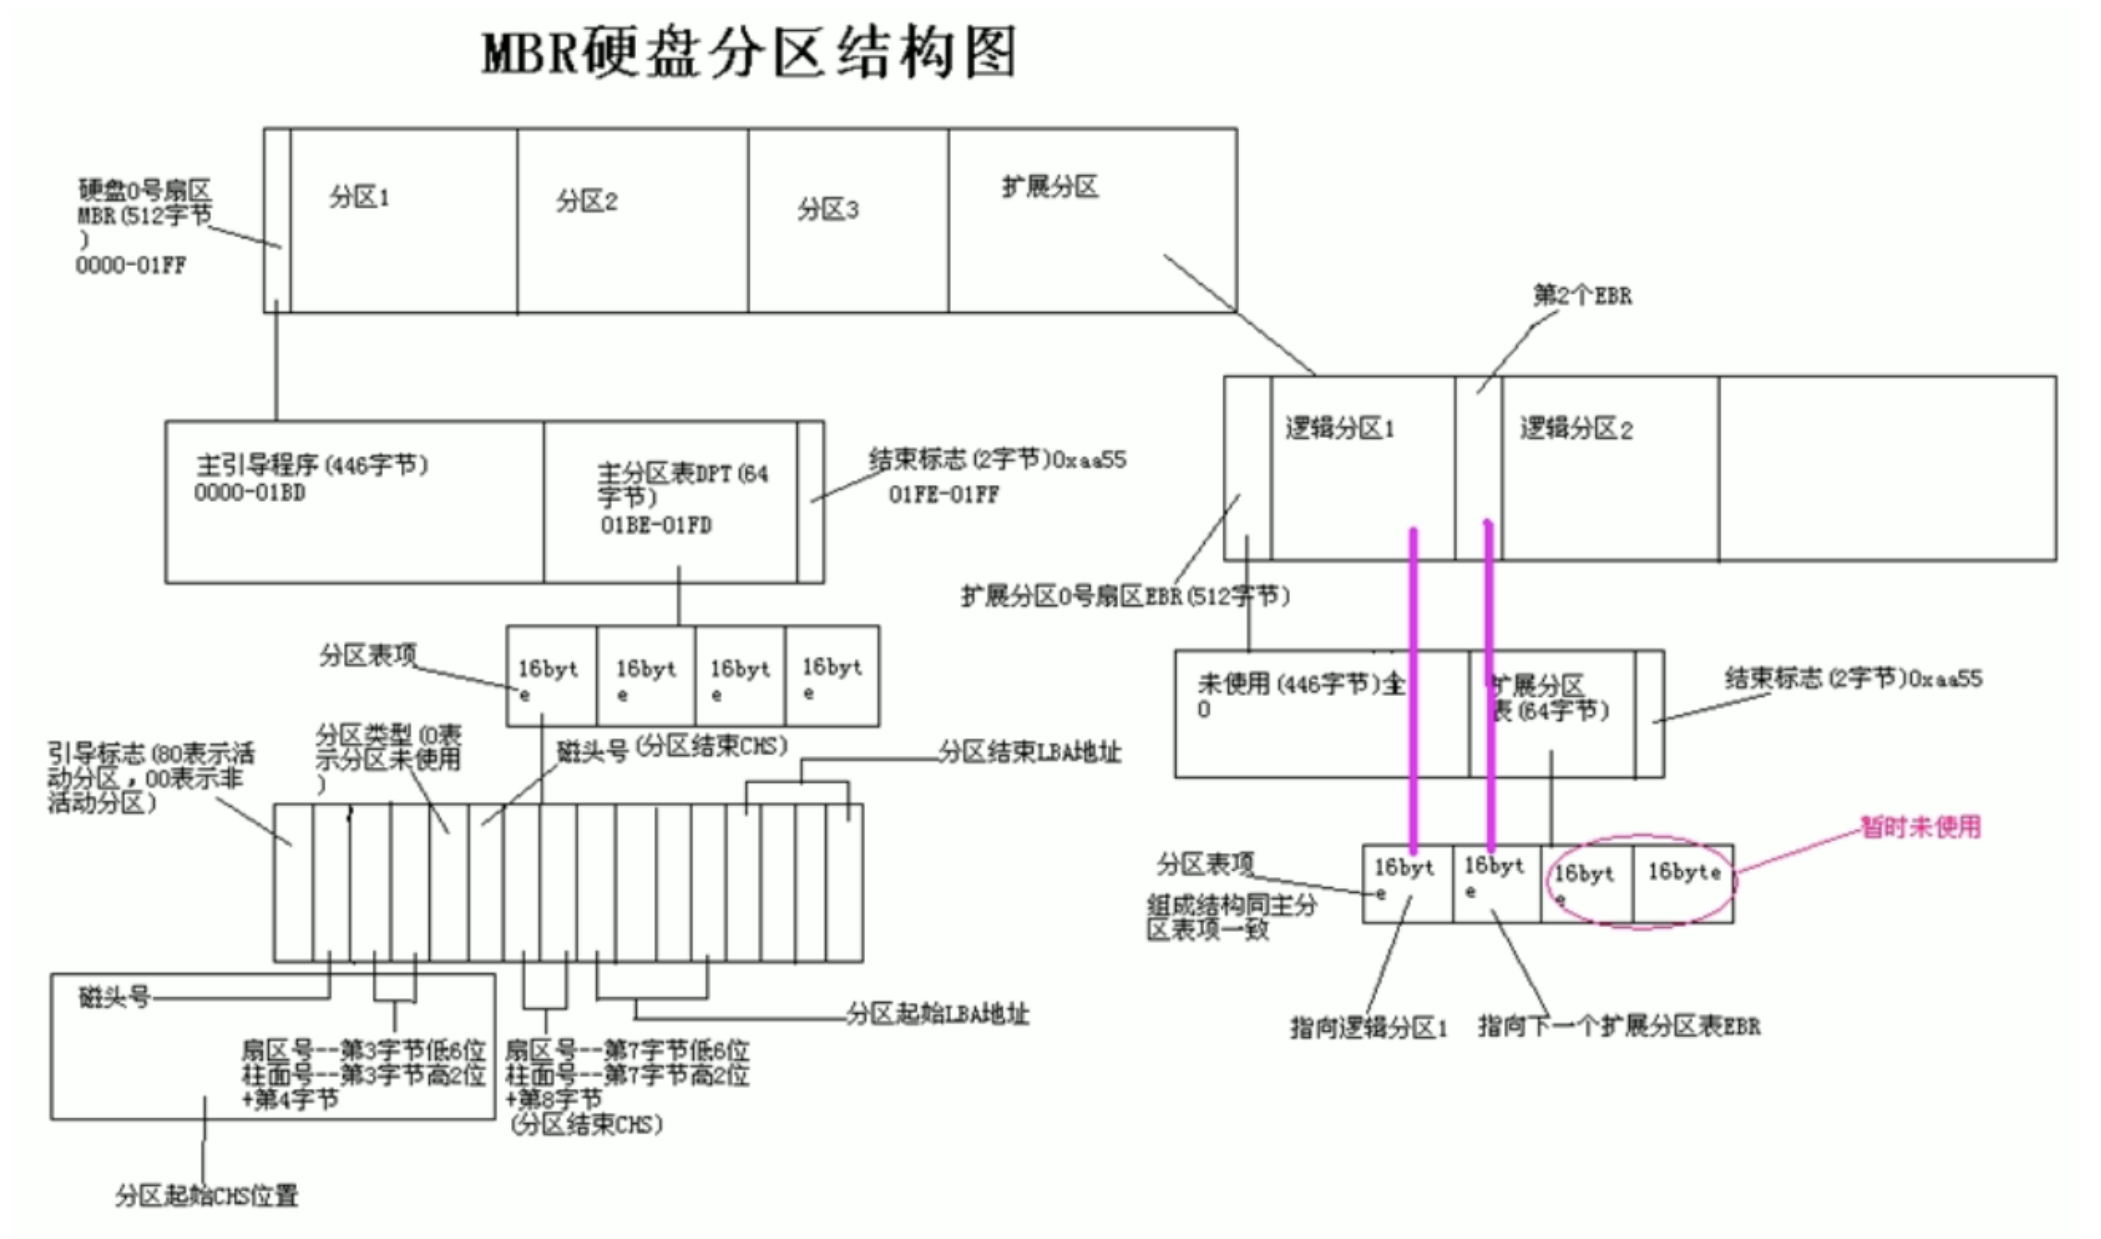
#使用fdisk命令对sdb硬盘分区
[root@centos7.9_105 ~]# lsblk /dev/sdb
NAME MAJ:MIN RM SIZE RO TYPE MOUNTPOINT
sdb    8:16   0  20G  0 disk
#查看硬盘情况
[root@centos7.9_105 ~]# fdisk -l /dev/sdb
....
#查看相关帮助
]# fdisk  /dev/sdb
Command (m for help): m
Help:

  DOS (MBR)
   a   toggle a bootable flag
   b   edit nested BSD disklabel
   c   toggle the dos compatibility flag
  Generic
   d   delete a partition   删除一个分区
   F   list free unpartitioned space
   l   list known partition types  列出当前支持的分区种类
   n   add a new partition  添加一个新分区 相当于图形化里面的新建简单卷
   p   print the partition table 列出当前状态的所有分区
   t   change a partition type   修改分区类型
   v   verify the partition table
   i   print information about a partition
#新建分区 一个5个G的分区
[root@centos7.9_105 ~]# fdisk  /dev/sdb
......
Command (m for help): n
Partition type:
   p   primary (0 primary, 0 extended, 4 free)
   e   extended
Select (default p): p  #选择分区类型
Partition number (1-4, default 1): 1
First sector (2048-41943039, default 2048):
Using default value 2048
Last sector, +sectors or +size{K,M,G} (2048-41943039, default 41943039): +5G #分配分区大小
Partition 1 of type Linux and of size 5 GiB is set

Command (m for help): p  #打印分区情况

Disk /dev/sdb: 21.5 GB, 21474836480 bytes, 41943040 sectors
Units = sectors of 1 * 512 = 512 bytes
Sector size (logical/physical): 512 bytes / 512 bytes
I/O size (minimum/optimal): 512 bytes / 512 bytes
Disk label type: dos
Disk identifier: 0x1f2e77b5

   Device Boot      Start         End      Blocks   Id  System
/dev/sdb1            2048    10487807     5242880   83  Linux

Command (m for help): w  #保存并退出
The partition table has been altered!

Calling ioctl() to re-read partition table.
Syncing disks.
#查看分区
[root@centos7.9_105 ~]# lsblk /dev/sdb
NAME   MAJ:MIN RM SIZE RO TYPE MOUNTPOINT
sdb      8:16   0  20G  0 disk
└─sdb1   8:17   0   5G  0 part
parted
#prated命令分区和fdisk命令不同,parted命令是非交互式的
#查看分区情况
]# parted -l
....
#创建gpt分区
[root@centos7.9 ~]# parted /dev/sdc mklabel gpt
Information: You may need to update /etc/fstab.

[root@centos7.9 ~]# parted /dev/sdc print
....
Partition Table: gpt

[root@centos7.9 ~]# parted /dev/sdc mkpart primary 1 1001
Information: You may need to update /etc/fstab.

[root@centos7.9 ~]# parted /dev/sdc print
......
Number  Start   End     Size    File system  Name     Flags
 1      1049kB  1001MB  1000MB               primary

[root@centos7.9 ~]# parted /dev/sdc mkpart primary 1002 2000

#删除分区
[root@centos7.9 ~]# parted /dev/sdc rm 2
Information: You may need to update /etc/fstab.

[root@centos7.9 ~]# parted /dev/sdc print
......
Number  Start   End     Size    File system  Name     Flags
 1      1049kB  1001MB  1000MB               primary
[root@rocky8 ~]#cat useradd.sh
#!/bin/bash
user_prefix="user"
for i in {1..100}
do
  username="${user_prefix}${i}"
  if id "$username" &>/dev/null; then
    echo "User $username already exists."
  else
    useradd "$username"
    echo "User $username has been added."
  fi
done